Installation
The theme is built for use with WordPress 3.8 and we recommend an upgrade to that version before proceeding to the installation process.
For an easy installation and setup process, please check our Video Tutorial on Vimeo!
1.1. Uploading and Activating the Theme
There are two different methods to install Renown WordPress theme:
-
Using the WordPress built-in theme uploader
- Go to the 'Appearance / Themes' menu in your WordPress Admin Dashboard:

- Click the 'Add New' button located on top:

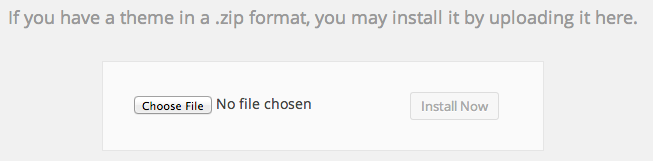
- Click the 'Upload Theme' button located on top:

- Press the 'Choose File' button, select renown.zip file and click 'Install Now':
- When the uploader is finished (might take a moment), click 'Activate Theme'
- Go to the 'Appearance / Themes' menu in your WordPress Admin Dashboard:
-
Uploading the theme files through an FTP client
- Using an FTP client (like FileZilla), connect to a server with your WordPress installation
- Navigate to /wp-content/themes/ folder and upload the theme folder there
- Log in to your WP Admin Dashboard and open the 'Appearance / Themes' menu
- You will now see Renown listed among the other themes. Just activate it!
1.2. Installing Plugins
After activating the theme, you will see a Required/Recommended Plugins notice:

To get maximum of the theme, please install and activate the required ones: Revolution Slider and Contact Form 7. For more information about specific plugin, please check the Plugins section.
1.3. Importing a Demo Content
This is an optional step but it helps you create your website faster thanks to pre-built pages, posts and portfolio known from the theme's Live Preview.
Importing the Demo Content:
- Go to the 'Tools / Import' menu in your WordPress Dashboard
- Choose WordPress and install the plugin if you haven't done so already
- Choose the 'renown-demo-content.xml' (can be found in /Demo Content/ folder) and press 'Upload file and import'
- When it's finished, you will see new posts, pages, portfolio items and menus on your website
NOTE: Photos visible on the theme's Live Preview are not included with the demo content due to their license type.
1.4. Basic Setup
After you have the theme installed, you will need to make a basic setup:
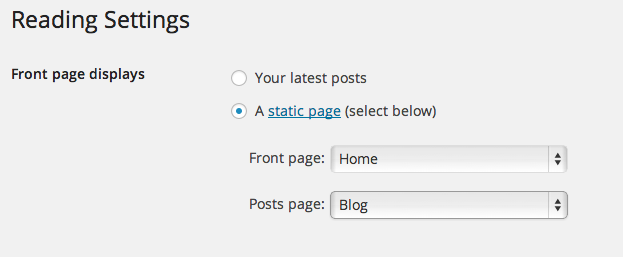
- Go to the 'Settings / Reading' menu and select a 'static page' at the 'Front page displays' setting. Choose your Homepage and Blog page there:
- Go to the 'Appearance / Menus' tab, enter a 'Menu Name' and press 'Create Menu'.
Now, just select the "Primary Navigation" checkbox located in the "Theme Locations" part: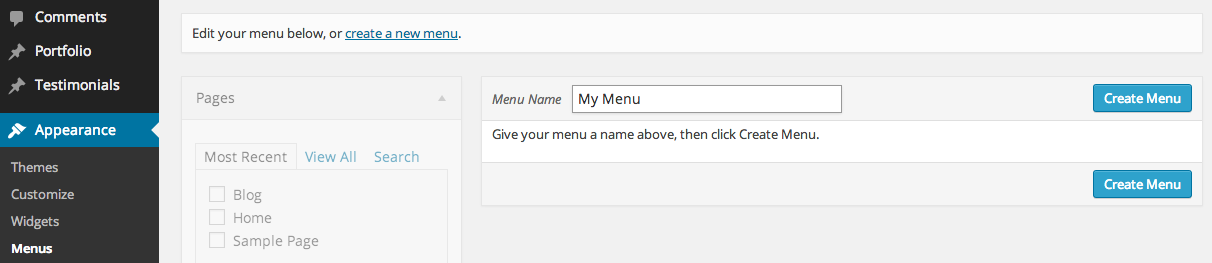
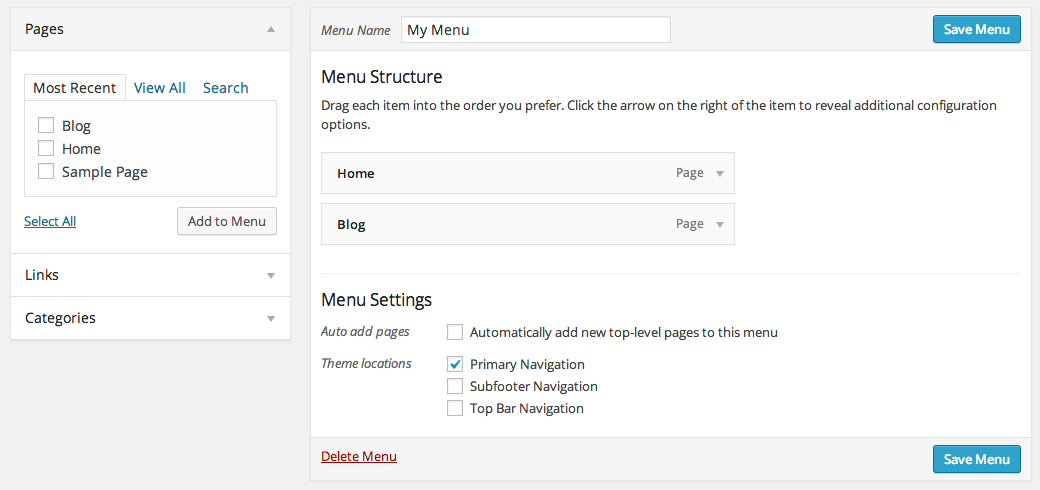
After you are done, just add some pages to your brand new menu and hit Save Menu button. Voila!
NOTE: If you would like to create a Mega Menu, please check This Section.
2. Theme Options Panel
Theme Options Panel is a place where you can control every aspect of your website with few button clicks. It is accessible from the "Renown" menu in your WordPress Dashboard:

Each available option there is well described 2 so you shouldn't have any problems with any of them.
2.1. Saving the Theme Options Panel
After you have made some changes in the panel, please don't forget to click the "Save All Changes" 1 button located both in the bottom and top section of the panel.
2.2. Restoring the default settings
To restore the Theme Options default data, simply hit the 'Options Reset' 3 button located at the bottom of the Panel.
2.3. Backing up settings
Backing up the current Theme Options state is truly easy. Just visit the "Backup" 4 tab and follow the instructions. After you create a backup you can then load it anytime later or on a different site location (while migrating servers and so on).
3. Theme Structure
This section covers information about the main theme sections.
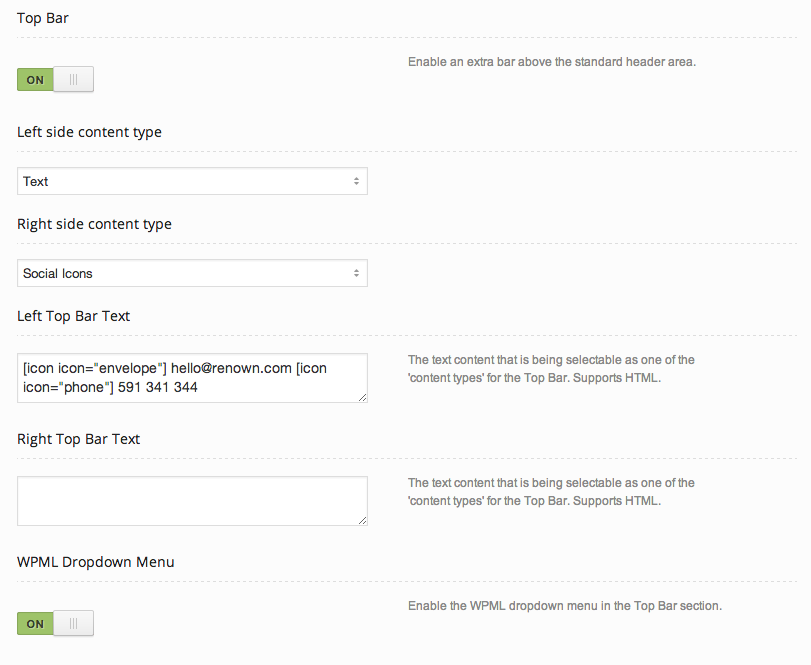
3.1. Top Bar
Top Bar is a section located at the very top of your website, right above the header:

The section is split in two rows. In each, you may select one of the following content types:
- Text
- Text + Menu
- Menu
- Social Icons
In addition, the right column can hold a WPML language select menu if the plugin is enabled.
You can configure or completely disable the Top Bar settings in the Theme Options / Header menu:
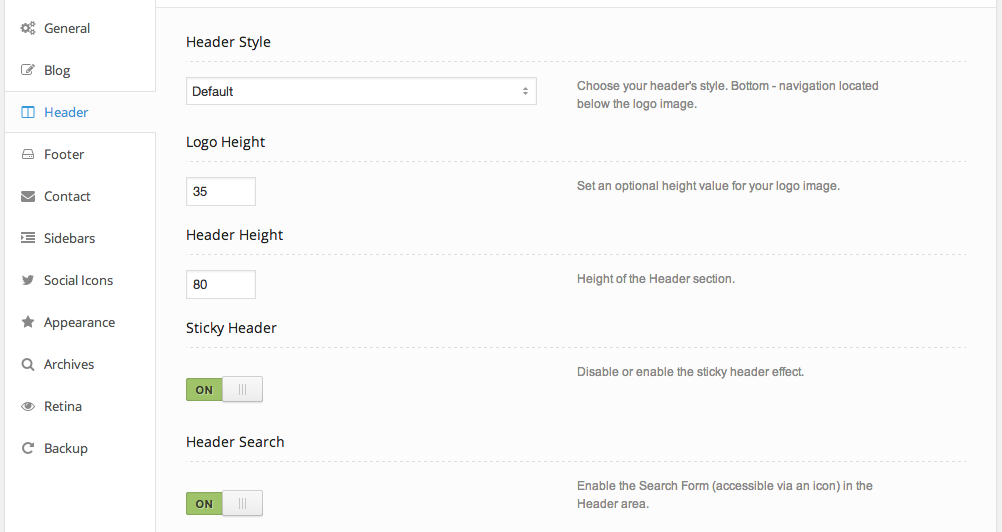
3.2. Header
Header is a section of your website that holds the logo image and the navigation menu:

As you can see, header also holds a Search Icon that gives an easy access to the website's search form. It is also possible to enable the WooCommerce shopping cart icon if the plugin is enabled!
You can configure, change the style and other settings of your Header in the Theme Options / Header menu:
3.3. Page Content
Page Content is a theme's section that holds your post and pages content. You may find more information about it in the Creating Content section.
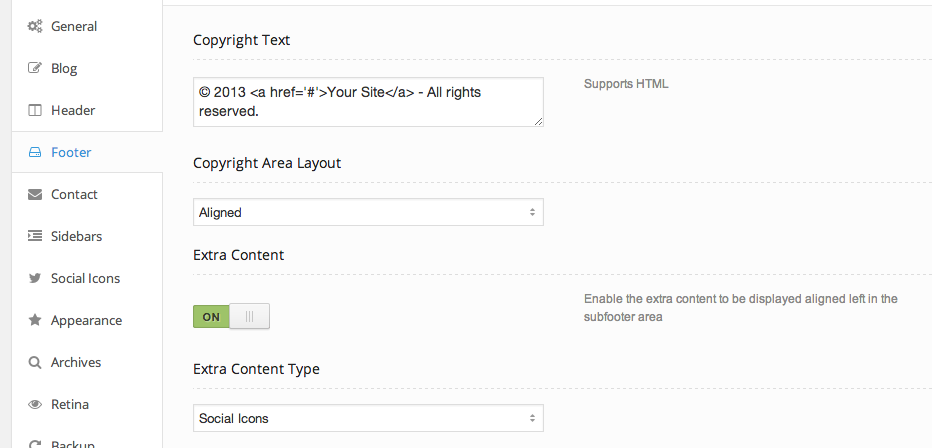
3.4. Footer
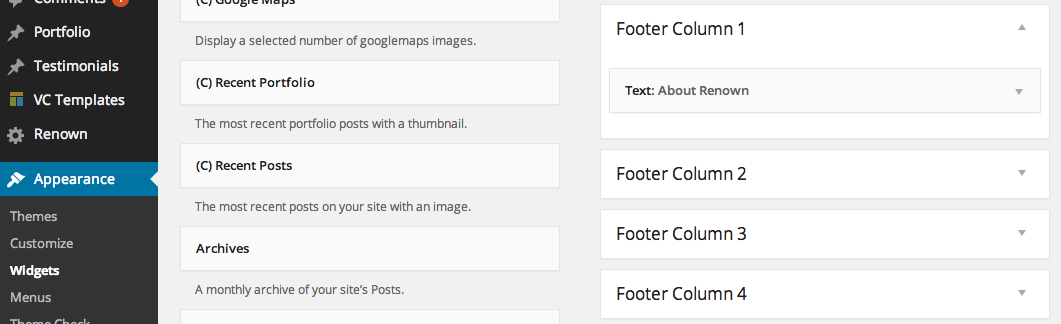
Footer is a section located at the very bottom of your site. It can hold the copyright data, social icons aswell as four column widget area:

The example above uses widgets as follows: Text Widget, Recent Posts, Recent Portfolio, Text Widget. To insert widgets into your Footer, simply visit the Appearance / Widget menu and drag few into your Footer Columns widget areas:
You can configure general Footer settings in the Theme Options / Footer menu:
4. Creating Pages and Content
This section covers information about the page and content creating process.
4.1. General Information
There are two ways of creating pages and posts content in Renown theme:
- Classic Way: Insert your content directly to the Content Editor and add shortcodes using Shortcodes Panels
- Page Builder (Visual Composer): Take it to the next level and get a full visual control over your page. Add rows, columns, content blocks and easily rearrange them with a drag and drop functionality. A full guide may be found here.
4.2. Page Layout
Renown comes with a truly simple page layout management systems. You can change the layout in the "Page Layout" metabox:
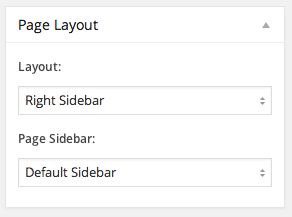
Here you can choose the layout of your page: Fullwidth, Right Sidebar or Left Sidebar. If the last two are selected, an extra dropdown menu with available sidebars shows up.
4.3. Page Header
You may also easily modify the page header's type in the "Page Header" metabox:
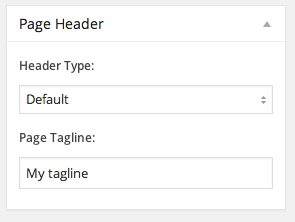
Available Options: Default (Page Title with optional Tagline), Custom (Custom Styling), None, Fullwidth Slider. The last two are available only if one of the external slider plugins (Revolution or Layer Slider) is enabled.
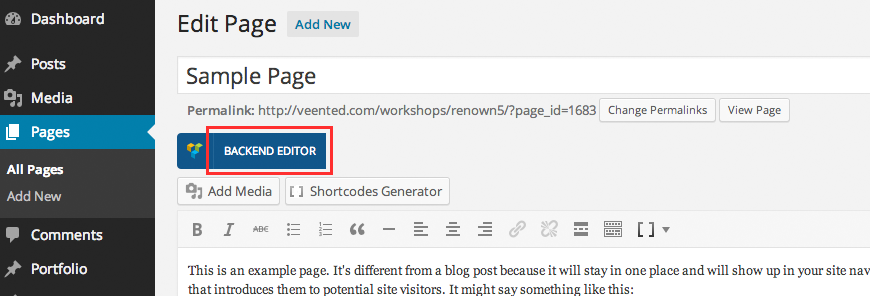
4.4. Visual Composer
Creating page or posts content with Visual Composer is extremaly easy. To start, click the "Backend Editor" button:
And this should be the effect:

As you can see, basic information is provided directly on the screen. However, let's make it easier! After hitting the "Add Row" button, here is what you get:

Numbers on the list represent points on the screenshot above:
- 1 Add row - add a new row to your page
- 2 Change the number of columns in the row
- 3 Add content blocks to the row
- 4 Add a new content block to your page (creates a new row automatically)
- 5 Edit Row settings
- 6 Remove Row
- 7 Duplicate Row along with it's content
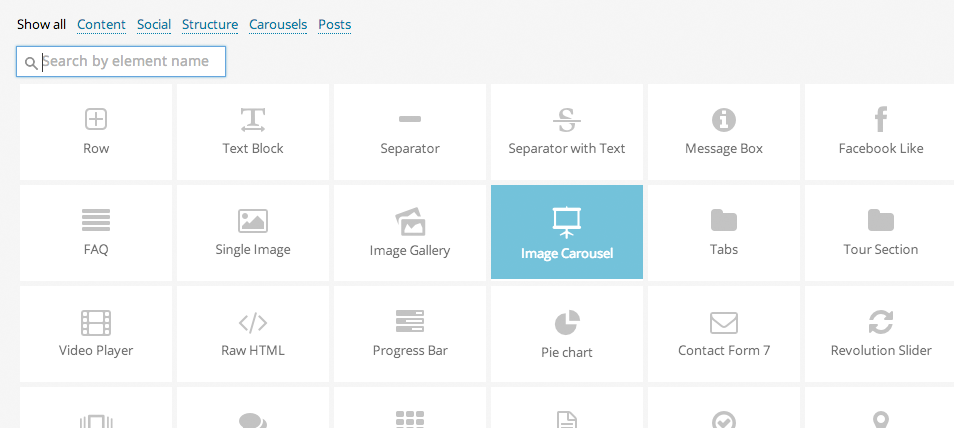
Let's add a new content block to our page. Let's click the "Add element" button (or the plus sign on a column area). A popup window will show:
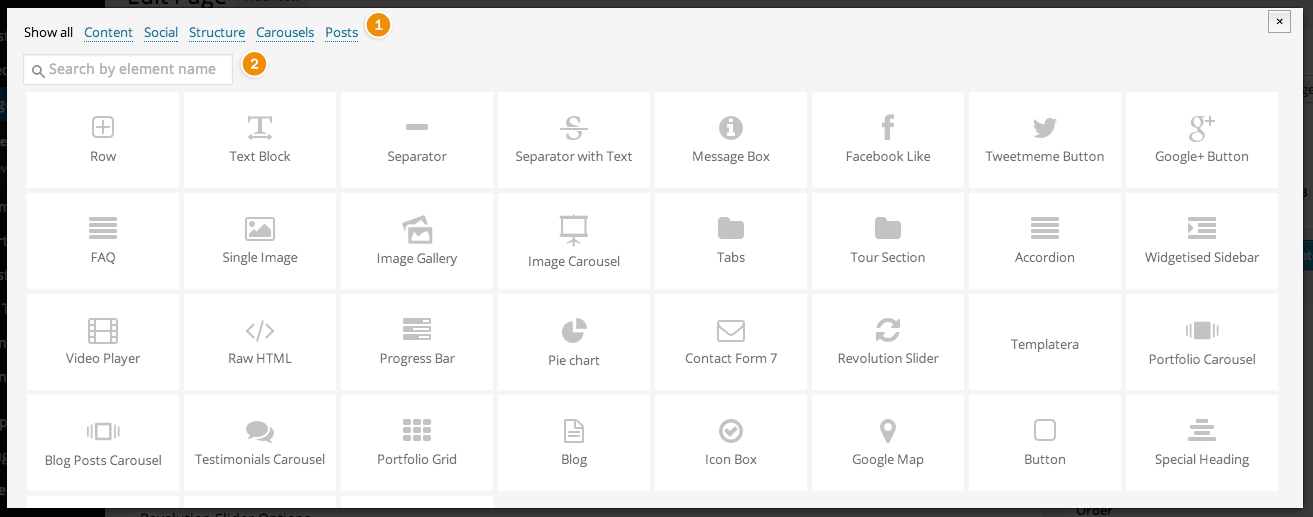
Simply choose a content block you would like to place on your page and click it. A new popup window will show up with block specified settings. It's that simple.
NOTE: As you can see, content blocks can be filtered by category (1) or you may search them by name (2).
And this is an example view after adding few content blocks:
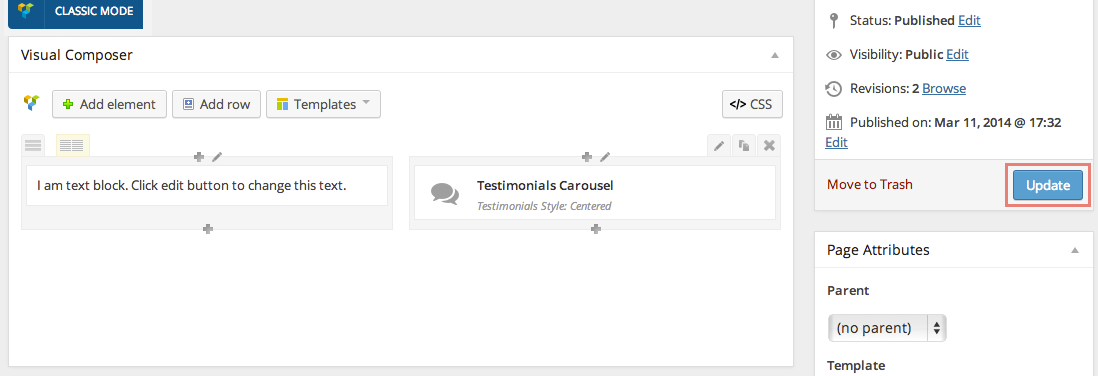
After you are done adding content to your page, simply hit the "Update" button located on the far right. Congrats! You've just created your first page using Visual Composer. Wasn't it simple?
4.5. Visual Composer Templates
Renown comes with prebuilt Visual Composer templates so you can load the layouts known from the theme's Live Preview directly into your website and then just adjust their content for your needs. Isn't that a time saver?
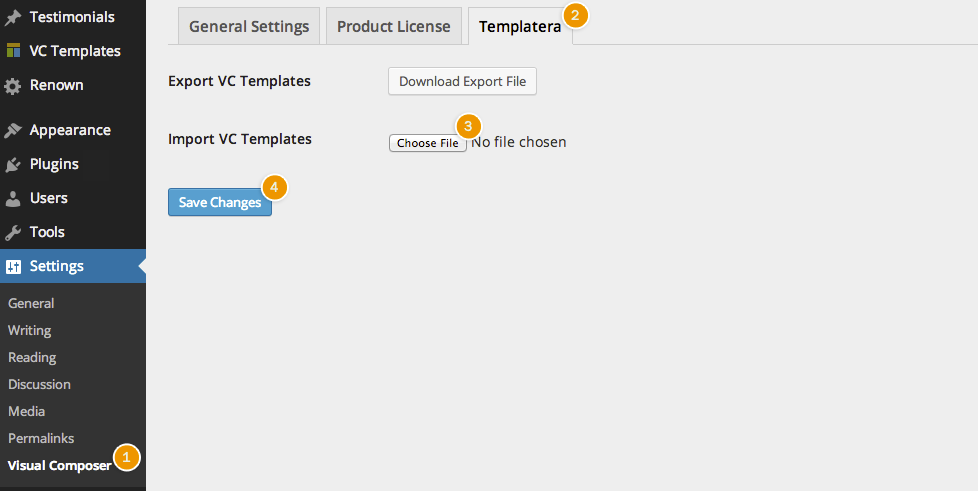
NOTE: Templatera templates are automatically imported with theme's demo content so if you have already loaded it, you don't need to separately import the file below.
To load templates, go to the "Settings / Visual Composer" (1) menu, click on the "Templatera" (2) menu and press the "Choose File" (3) button. After the window popups, choose the composer-templates.xml file located in the /Demo Content/ folder. After it's done, hit the "Save Changes" (4) button. Voila!
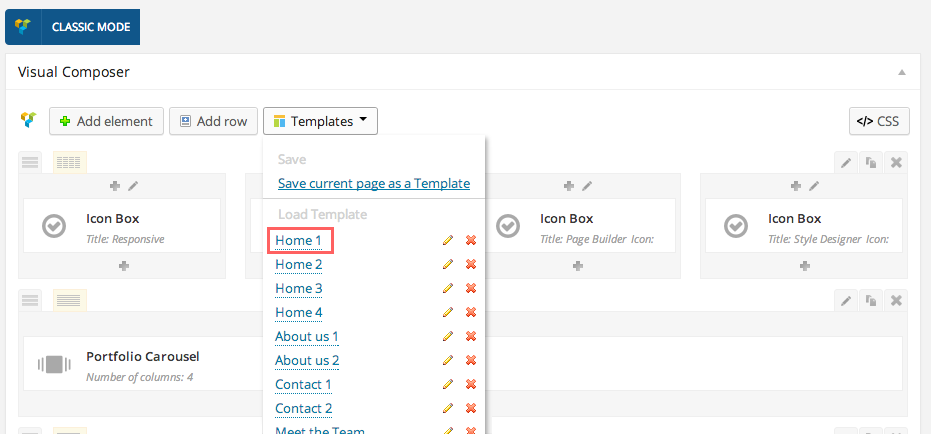
How to use templates? Simple edit/create a page or post, switch to the "Visual Composer" mode and press the "Templates" button. From the dropdown list choose a desired template.

4.6. Homepage
The homepage known from the theme's Live Preview is built with Visual Composer. After loading the Visual Composer Templates, switch to the Visual Composer mode and from the "Templates" dropdown menu choose one of the available homepage layouts:
That will load the content blocks for your brand new homepage. However, one element is still missing - the slider. You may do one of the following:
- Insert a fullwidth slider. To do that, simple change the Header Type to "Fullwidth" slider and select the specific Revolution Slider (or Layer Slider) as shown below:

More information about creating a Revolution or Layer slider can be found here.
- Use a simple Flex Slider. To do that, just add the "Image Carousel" element in Visual Composer:
4.7. Portfolio
Portfolio is a page where portfolio posts are being displayed. Check the Creating Portfolio section for more information.
4.8. Contact
Contact template is page with a fullwidth Google Map. To create a page with a fullwidth Google Map, choose the 'Contact' template:
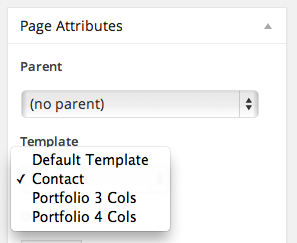
Visit the 'Contact' tab of the 'Theme Options' to change the map settings like Location, Height, Zoom and else.
4.9. Archives/Search
Archives and Search are special type of WordPress pages for search results and displaying posts by a certain category, tag, date or author. You can change their displays settings in the "Theme Options / Archives" menu.
5. Creating Portfolio
Portfolio is a page where portfolio posts are being displayed. And it's truly easy to create one! Let's begin.
5.1. Adding Portfolio Posts
Before creating the portfolio page itself, you will need to create some portfolio posts first. To do so, simply visit the Portfolio / Add new menu:

A super basic portfolio post requires the Post Content, Featured Image, Post Categories fields to be configured. And of course some images in the Post Gallery. For much more information about portfolio posts please check the Portfolio Posts section.
5.2. Portfolio Page
After we've got some portfolio posts, we will need a portfolio page that will display them for us. Let's start by creating a new page:
Now, you can choose one of two ways of creating a portfolio page:
- Basic One - After creating a new page, simply select one of the available Portfolio Templates in the "Page Attributes" metabox:
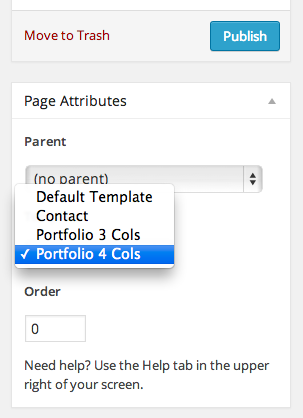
Next, simply hit the "Publish" button and voila - you have just created a super basic portfolio page! However, since it's the easier way - you won't be able to further customize your portfolio page in terms of displayed categories, number of columns or style.
- Default One - This way you will be able to control every aspect of your portfolio page. After creating a new page, simply switch to the "Visual Composer" view, click "Add Element" and select "Portfolio Grid". After you do, a configuration window will popup. Each option is very well described there so you won't have any problems setting it up:

After you are done, simply click the "Save" button and then Publish your page.

NOTE: A "Default Template" (set in "Page Attributes" metabox) is needed when creating a portfolio page this way.
And of course - you may create as many portfolio pages as you want.
6. Portfolio Posts
Here is a basic view of the portfolio post in the dashboard:
As you can see, each field is very intuitive. Here is a list:
- 1 Post Content - you can insert any text content here including shortcodes of course.
- 2 Post Settings - here you can set the Post Layout. If it is set to Sidebar, the content will be displayed on either right or left side of the page while the bigger part will hold the post's gallery or video. The "Thumbnail" option let's you decide if the post's thumbnail clicked (on a portfolio Page) opens a lightbox gallery or leads directly to the invidual post page.
- 3 Post Gallery - easily add images to your post gallery by simply clicking the "Create Gallery" button (on the screenshot above replaced with "Modify Gallery" since images are already added). The Gallery Type dropdown list let's you easily change the type of your gallery: Lightbox, Slider, Images List and so on.
- 4 Post Video - if you would like to add a video to your post, simply insert it's URL/link here. It will automatically be displayed above the post's gallery if one exists.
- 5 Post Categories - those are necessary for the filtering menu on the portfolio page to work. Simply add few by clicking the "Add New Category" button.
- 6 Featured Image - the post's thumbnail is based on the post's Featured Image so it is necessary to upload one.
Below, you can see how to create basic portfolio posts (known from the theme's live preview).
6.1. Gallery Post
As with every portfolio post, you need to start by adding some content to your portfolio post, setting up categories and uploading a Featured Image (each is better described here.
To create a post gallery, simply click the "Create Gallery" button in the "Portfolio Post Gallery" metabox:
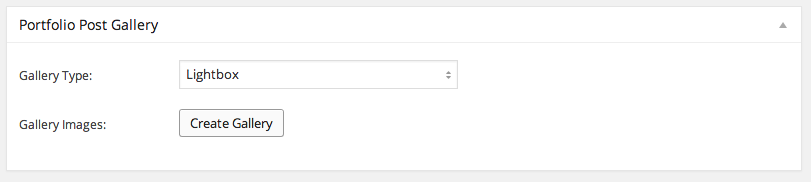
The process is exactly the same as with Blog Posts Gallery. After adding some images simply choose a type of the gallery.
After creating the gallery, you can change it's layout in the "Post Settings" metabox:

After those steps simply click the "Publish" button and voila!
6.2. Video Post
As with every portfolio post, you need to start by adding some content to your portfolio post, setting up categories and uploading a Featured Image (each is better described here.
Creating a video post is truly simple. Just insert the video URL in the "Portfolio Post Video" metabox:

A full list of supported sites can be found here.
And basically that's all! You may of course create a gallery aswell. It will be displayed below your video.
6.3. Extended Post
As you may have already noticed, portfolio posts can also be created with Visual Composer! However, a basic setup is still required: Featured Image and Portfolio Categories.
To begin, simply switch to the Visual Composer view and start adding content! More information about building page content using this method can be found in the Visual Composer section.
NOTE: It is required to use the Fullwidth post layout when creating content using the Visual Composer.
6.4. Example Post Content
Here is an example text content template that you may insert into your portfolio posts (simply copy and paste):
Project Information
Morbi auctor sem leo, non cursus arcu lacinia in. Mauris malesuada facilisis venenatis. Vivamus purus ipsum, auctor id ultrices ut, vestibulum vel augue. Maecenas ultrices purus sed urna pretium aliquam. Pellentesque vel lectus eros. Nullam ut mauris elit. Aliquam pharetra quam id turpis tristique luctus. Nullam vestibulum dui turpis. Suspendisse scelerisque, dui sed euismod lacinia.Skills:
[list icon="check" background="yes"]
[li]Adobe Photoshop[/li]
[li]Adobe Illustrator[/li]
[li]HTML5[/li]
[li]CSS3[/li]
[li]WordPress[/li]
[/list]Client:
Montreal Family Coffee
7. Blog Posts
Here is a basic view of the blog post in the dashboard:

As you can see, each field is very intuitive. Here is a list:
- 1 Post Content - you can insert any text content here including shortcodes of course.
- 2 Post Thumbnail - here you can decide if a thumbnail (Featured Image) should be displayed on the invidual post page or not. You can also enable or disable the lightbox effect on thumbnail click (only on Standard post format) and set the thumbnail's height.
- 3 Post Format - easily choose a format for your post. Each option will open an extra meta box for a specific type of a post, i.e. selecting the "Gallery" format opens a "Post Gallery" metabox that will let you create a gallery for your post.
- 4 Post Categories - the post categories.
- 5 Featured Image - post thumbnail.
7.1. Standard
This is the simplest blog post format. The screenshot in the section above presents a standard blog post.
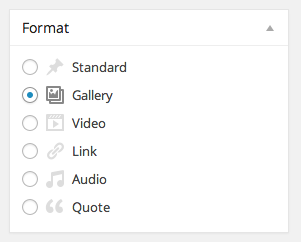
7.2. Gallery
To create a Gallery type post, simple select the "Gallery" option in the "Post Format" metabox:
It will open a new "Gallery Settings" metabox:
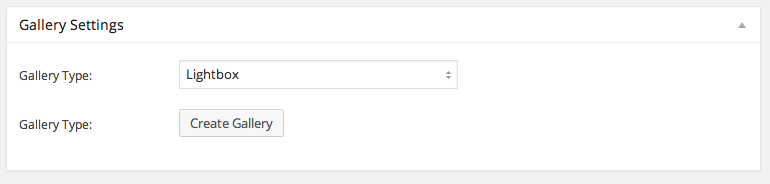
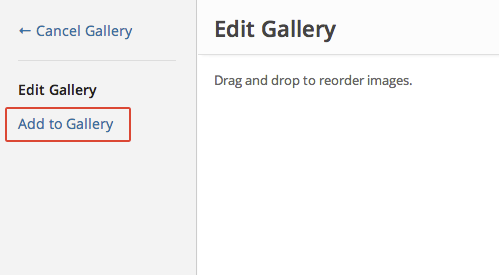
To add images to the gallery, simply click the "Create Gallery" button. In the popup window click the "Add to Gallery" button:
Here you upload new images or select the existing from your media library:
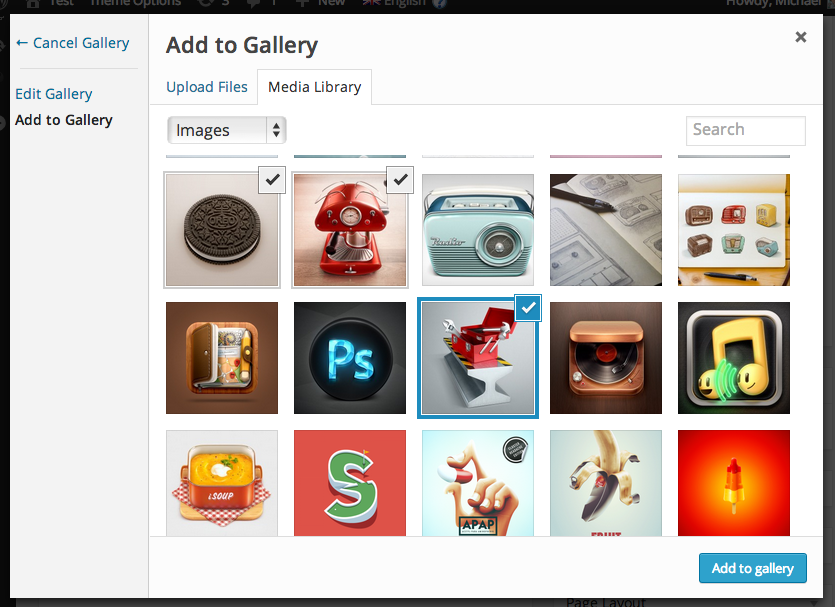
After you are done, click the "Add to Gallery" button and then "Update Gallery". New thumbnails will appear in your "Gallery Settings" metabox:

After you have your gallery created, simply choose it's type in the "Gallery Type" select menu and Publish the post!
7.3. Video
First of all, select the "Video" option in the "Post Format" metabox. A new "Video Settings" metabox will open where you can insert a URL/link to your video:

A full list of supported sites can be found here.
7.4. Link
Select the "Link" option in the "Post Format" metabox. A new "Link Settings" metabox will open where you can insert the link:

7.5. Audio
Select the "Audio" option in the "Post Format" metabox. A new "Audio Settings" metabox will open where you can insert a URL/link to your .mp3 file:

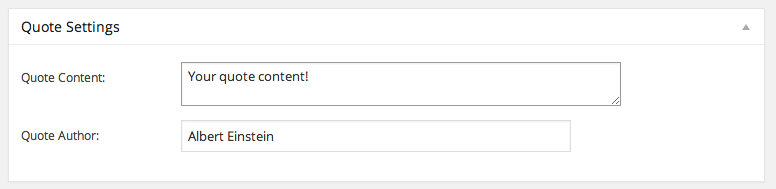
7.6. Quote
Select the "Quote" option in the "Post Format" metabox. A new "Quote Settings" metabox will open where you can insert the quote content and author:
8. Theme Customizer
One of the coolest Renown features is definitely our very own Theme Customizer. It is accessible directly from the Theme Options / Appearance tab:

Every change that you make appears immediately on a small preview on the right!
These tabs: Header, Page Title, Content, Footer and Subfooter don't need explanation - you can change almost every color aspect of selected theme section. Rest of them described below.
8.1. General
In the General tab you can change main settings of the theme looks like the Accent Color, Layout mode, Site's Width or Website Background (only if Boxed Layout is selected).
8.2. Predefined Styles
In the Predefined tab you can choose one of the predefined style either for Accent Color or a whole color scheme for a specific section of your site:

Changing a color scheme of your header, footer or page title section was never easier!
8.3. Typography
In the Typography tab you can change font families for Headings and Parapgraphs, their weight and invidual font sizes:
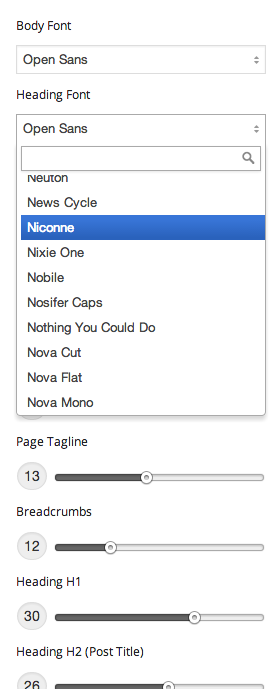
Whole Google Font library accessible in a single mouse click!
9. Shortcodes
Renown comes with many shortcodes that will let you build any page content in no time. There are actually three ways to access shortcodes and each is explained below.
9.1. Quick Shortcodes
This is the simplest way to access and insert shortcodes. While in the Page/Post Content Editor, click the double bracket icon and a dropdown menu will open:

There you can select one of numerous shortcodes available that will be immediately added to your editor's content.
9.2. Visual Shortcodes Generator
Renown also comes with a very cool Shortcodes Generetaor. It helps you create more complex shortcodes like tabs, toggles and so on. To access the Shortcodes Generator panel simply click the "Shortcodes Generator" button:

A popup window will open where you can select a shortcode to generate from the list on the left. Below is an example view of the "Toggle" tab:
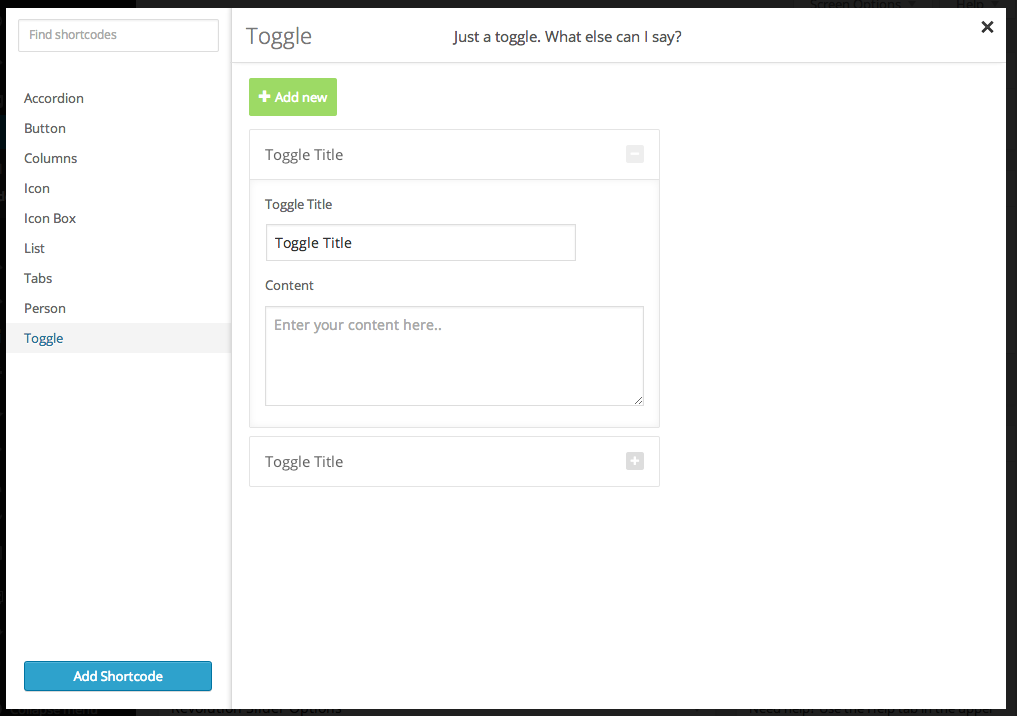
After you are done configuring your shortcode, simply hit the "Add Shortcode" button and the code will be automatically added to your current editor's content!
9.3. Visual Composer
Previous methods are very simple. However, the best and simplest way to manage your pages or posts content is Visual Composer. Most of shortcodes are available as element blocks that you can easily reconfigure, resize and modify at any time, without a need to insert them from scratch. More about Visual Composer can be found in this section.
NOTE: Please note that not all shortcodes like Font Awesome Icons or Icon Lists are available with Visual Composer. However, you may easily combine those two methods by creating a "Text Block" in Visual Composer and adding them using the Quick Way.
10. Sidebars
Renown fully supports widget locations (sidebars). There are default ones that come automatically upon theme activation and with the Sidebar Generator you may create as you only need.
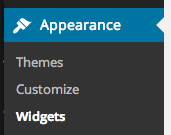
You can add widgets to your sidebars in Appearance / Widgets tab:
10.1. Default Sidebars
Renown comes with default sidebars for mayor locations:

Those are:
- Default Sidebar - this is a default sidebar set for any page that uses a "Sidebar" layout including blog posts and page.
- Archives/Search Sidebar - sidebar displayed on an Archives and Search results page
- Footer Column 1-4 - widget areas for Footer. More information can be found in the Footer section
10.2. Sidebar Generator
With the Sidebar Generator, you may create as many sidebar locations as you only need. It's accessible via the Theme Options / Sidebars menu:
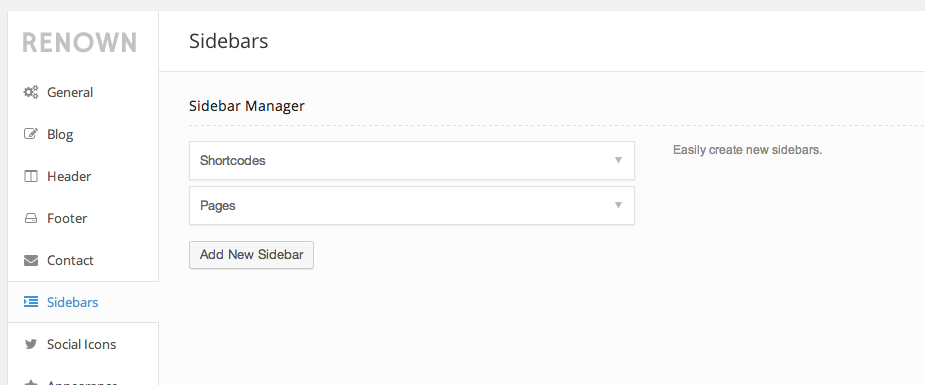
To create a new sidebar, simply click the "Add new Sidebar" button. After you are done setting a name, Save Theme Options and visit your Appearance / Widgets menu. You will see your brand new sidebar listed among the theme's default sidebars!
11. Widgets
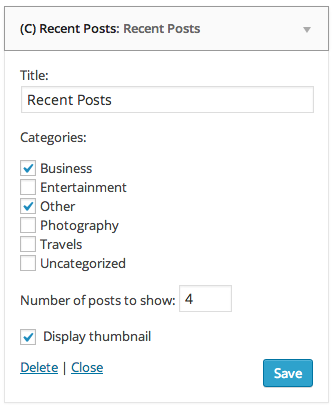
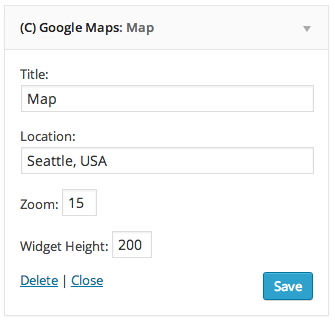
Renown comes with 3 custom widgets. Each of them is filled with an example settings and is described below.
Concerns all widgets: Title is a title of the widget. You may leave it blank.
11.1. Recent Posts
A widget that displays the most recent blog posts in certain categories on your site with/without a thumbnail.
11.2. Recent Portfolio
A widget that displays the most recent portfolio posts in certain categories as a list or a small thumbnail grid.

11.3. Google Maps
Easily display a google map on your sidebar!
12. Mega Menu
Renown comes with a native Mega Menus functionality and it's really easy to use!
First of all, open the Appearance / Menus tab and add second level elements to your Menu as shown below:
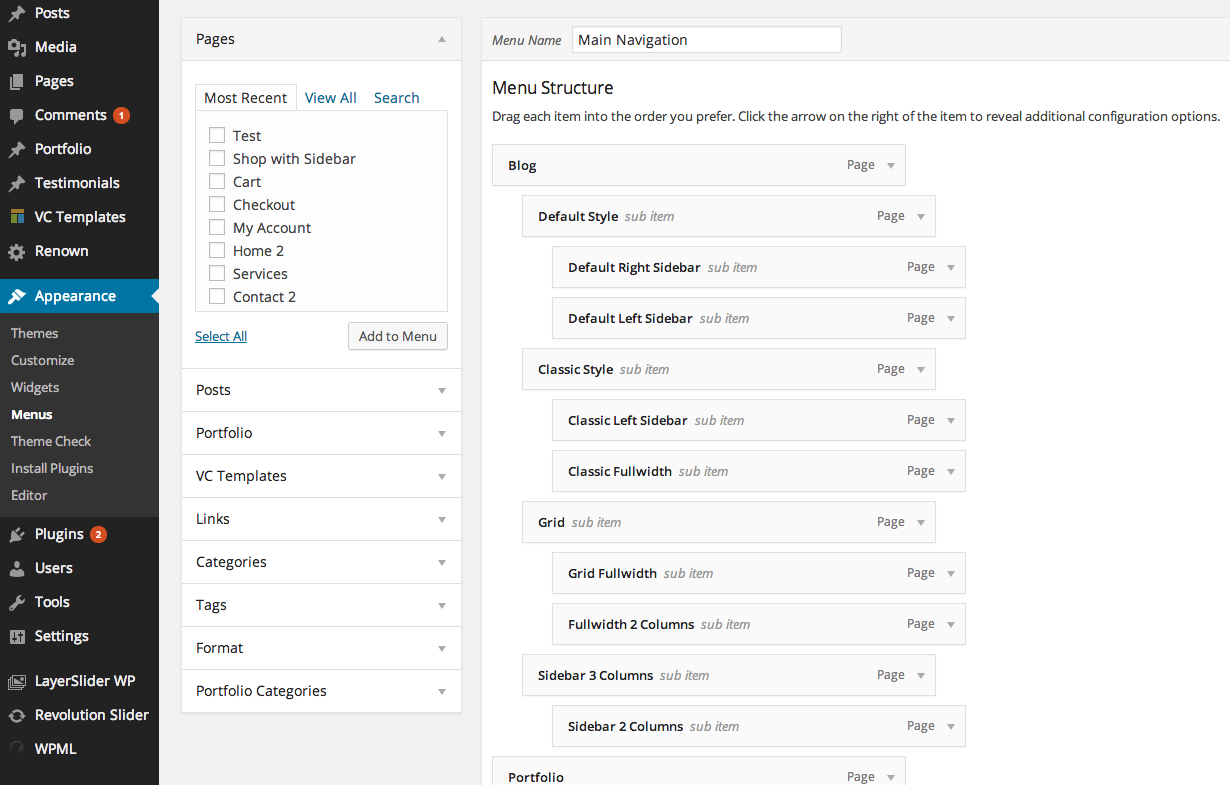
Next, open the very parent element and add a "mega" class to the "CSS Classes" field:
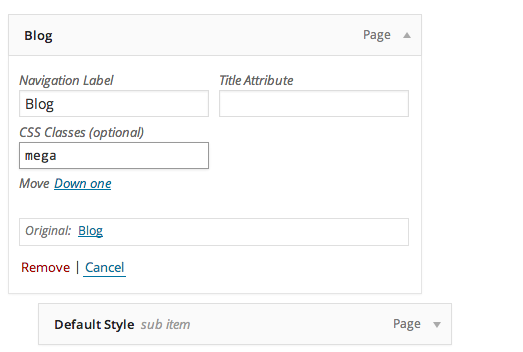
NOTE: If you cannot see the "CSS Classe" field, please open the "Screen Options" menu located at the very top the site and check "CSS Classes" option:

After that, all you need to do is Save your menu. You have just created a 4 column mega menu!
NOTE: If you would like to disable the mega menu's Column Heading then just add an extra no-heading class to the menu's parent element.
13. Plugins
Renown comes with a number of plugins support including premium ones like Revolution and Layer Sliders. Two plugins are required: Contact Form 7 and Revolution Slider. After you activate the theme, you will get a notice informing about it:
After clicking the "Begin installing plugins" button you will be moved to the "Install Plugins" menu where you can easily install each required plugin:

Premium plugins documentation files can be found in the same /Documentation/ folder as theme's documentation.
13.1. Revolution Slider
Revolution Slider can be installed via the Appearance / Install Plugins menu. You may also install it manually by uploading the .zip file from the /renown/framework/plugins/lib/ folder.
Plugin documentation can be found Here.
13.2. Layer Slider
Revolution Slider can be installed via the Plugins / Add New menu. You may find the plugin's .zip file in the /Plugins/Layer Slider/ folder inside the theme's downloadable package.
Plugin documentation can be found Here.
13.3. Contact Form 7
Contact Form 7 is a free plugin and also can be installed via the Appearance / Install Plugins menu.
Plugin documentation can be found Here.
13.4. WooCommerce
WooCommerce is a free e-commerce plugin by WooThemes. You can download it from their official website:
http://www.woothemes.com/woocommerce/
Full plugin documentation can be found Here.
13.4. WPML
WPML is the WordPress Multilingual Plugin that makes it easy to build multilingual sites and run them.
You can download the plugin from the official website:
Plugin documentation can be found Here.